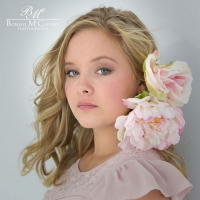
Sunday, May 3, 2009

Creativity Spark - Take an Internet Walk

I have just discovered an amazing way to really *Spark* a creative slump. I call it taking a walking on the internet. So here's how it goes:
1 - Go to Google and select the Image search
2 - Pick a design word to search - a couple of my favorites are Decorative, Floral, Swirls....
3 - This will display a bunch of images. I quickly scan to see if there's anything inspiring. When I see something that sparks something I click on it.
4 - Once I have a larger image, I right click the image and Save to a folder I set up called Inspirations.
5 - The go back to the search page, click next and see what else you find.
6 - When I get tired of this, maybe 30 pages in, I go take a look at my Inspiration folder. I print out a bunch and then go doodling using the printed designs ONLY as inspiration.

So where did this lead? On one of my searches on the word "Rosemaling" I found a bunch of images.
Here's a couple doodles I did. I decided to create some design elements that I could combine.


Then I enlarged the designs and played with them to create a full size design that I traced on a piece of Pellon Decor Bond. This was fused to the back of a black piece of fabric. The design was stitched out with Candlelight in the bobbin (like my DigiBobbETM).

Then I plan to paint in some of the spaces with DecoArt SoSoft Fabric Paints. This is like a class I teach called "Stitch N Glitz" (which BTW I'll be teaching in Vermont and Long Beach, CA).

So here a peek at a the stitched design I have in the works. Wait till you see what else I'm doing to it......


Tuesday, March 31, 2009

Sliding Design Wall

There's some talk about design walls on QuiltArt and I wanted to show you mine. You can see that I did not bother to neaten up before taking the photo.

The great thing is my 2 design walls are mounted IN FRONT of my sliding door closets that hold all of my fabric. The beauty of this is that the wall serves 2 purposes - fabric storage AND design wall. Keeping fabric behind closed doors helps prevent fading (if you can remember to close them that is).

Here's how I did it:
- Covered to sheets of insulation with felt.
- Mounted these to paneling the same size (this gives the sliding door wheels something to screw into
- Installed 2 sliding door kit rails to the ceiling (in a line to create the longest possible continuous rail)
- Hung the design walls on the rails

Sunday, March 15, 2009


Pine Needles Technique

Someone on QuiltArt asked about a textural technique to create pine needles. I remember experimenting years ago - and I keep my experiments in a notebook (in plastic page protectors). So I dug this sample out to show. It's not the best colors - it's more about the technique - and it also looks a little messy, but you'll get the idea.
In this example the pine needles were added to a silk ribbon done with my "Twisted Branch" technique found in my "Fantasy Floral Quilts" book (which is out of print, but there a few copies left on our website).

1 - I used YLI Pearl Crown Rayon thread. I pulled off a couple long pieces (maybe 1-2 yards) and pulled them under a medium temp iron to remove the coiling. I wound the thread around a my hand to get a bunch of threads lined up. Tape the threads together temporarily until it's stitched down.
2 - Then cut the ends so the thread tails are free giving the look of pine needles. I'd love to see photos if you try this technique - bonnie@bonniemccaffery.com.

Saturday, February 7, 2009

Hey,

I'm a Guest Blogger at Quilting Gallery's Blog.


If you ever wanted to hear more about my quilting career and see a sampling of some of my quilts, here's the place to see it.

Enjoy,

Bonnie

Friday, January 30, 2009

Portrait Quilts BOOK Reprint

I am SOOOOO excited to announce that we have finally reprinted the "Portrait Quilts: Painted Faces You Can Do" BOOK. It has been out of print for quite some time and I have heard from so many people that they would have loved to have owned the book. And so we spent the money and reprinted the book. http://BonnieMcCaffery.com


If you have ever wanted to learn to paint a face on fabric, this is the book for you. It shows you step by step how to paint each of the features. EVEN A BEGINNER CAN DO THIS. The secret is a tracing of a photograph under the fabric so you can see exactly where to paint each of the features.


If you're a visual kind of person and need to see the painting in action, we also have the "Painted Face for Beginners" DVD.


I would love to see photos of faces you've done using this technique.

Tuesday, January 6, 2009

A New Portrait

I'm home for a nice long stretch of time - which is very refreshing. Being on the road all the time does not leave time for any creativity, so 10 weeks home is a good thing.

I had a chance to play and felt like painting a portrait from a photo I took of my daughter. It's a gorgeous photo. I decided to flip her the other direction and use a different head shot, but I absolutely love the painted draping.

I'm not sure about the background or the hair yet, but I'll play another day. Just in case you wanted to trying painting a face, you can check out my "Painted Face for Beginners" DVD (yes BEGINNERS can do this) on my website.


Monday, June 30, 2008

Alternative Creativity - Painting a Bernina


Life presents you with some very interesting creativity opportunities sometimes. I was presented with one of these opportunities very recently - I had the opportunity to decorate a Bernina sewing machine to be auctioned off.

This sounded like too much fun to pass up. I didn't really have time, but this was really something that sounded like it could be a lot of fun - and I don't get to have much creative fun lately, so I jumped at the opportunity. Bernina offered this opportunity to 12 designers (and I am so honored to be one of the chosen). I know Laura Cater-Woods and Robbi Joy Eklow are 2 of the other designers.
I knew I wanted to paint it with some DigiBobbE styled designs and I didn't want the base coat to be white. I used a plastic paint as the base and then added a automotive metallic blue paint. My husband took the whole machine apart so it would be clean and neat.
I sketched the DigiBobbE style designs with chalk and then painted it with Testors paint - it took at least 2 coats. Way cool! Added some rhinestones and then according to the Bernina guidelines it needed to have something sewing related - so I made some machine embroidered butterflies on tulle with Tintzl between the layers, cut them out, and added them to the gold painted wire curls.
This machine still works. I think the lucky winner of this machine will be thrilled to have a beautiful piece of art that also works as a sewing machine. If you want to bid on this machine, you'll probably have to go through a Bernina dealer that is going to BU (Bernina University).
So you see, life may present other opportunities for creativity other than fabric. Do what you love!
Bonnie Lyn McCaffery http://BonnieMcCaffery.com